

How To Edit Your Book: Using Sticky Notes to Storyboard After The First Draft
- Diana Elizabeth Clarke

- Jul 16, 2025
- 9 min read
Watch “I Make A Plot Map With Sticky Notes” to see a writer restructure their book in real time.
Let’s talk about the most difficult part of writing a book: the editing. Writing a book is fun, but the editing and revising is the part authors dread. I know, because I'm one of them.
As I began reworking my novel, I fell down a hole of self-doubt and lost all of my confidence. I even considered giving up on this book entirely and starting a different project despite having 72,000 works written.
Why? Because it was messy. There were too many moving parts and I couldn’t remember where I was going. I did, however, sit on the first draft for four years before attempting to edit the manuscript and that certainly made things harder.
I do recommend walking away and letting yourself forget about your writing after the first draft because that helps you be more critical of your writing and less emotionally attached to kill your darlings. Walking away means you can view your work with a fresh set of eyes.
But, I do not recommend walking away for four years because I forgot nearly everything about my book. As I read Chapter 2, I was hesitant to make any major changes because I couldn’t remember where all of the details were. I was afraid of creating plot holes and inconsistencies.
I recognized the mess in my writing but I had no clue how to clean it up. Hence, I considered walking away from this book again and leaving it behind forever. But that all changed when I decided to the the sticky note method.
Editing Technique: The Sticky Note Method
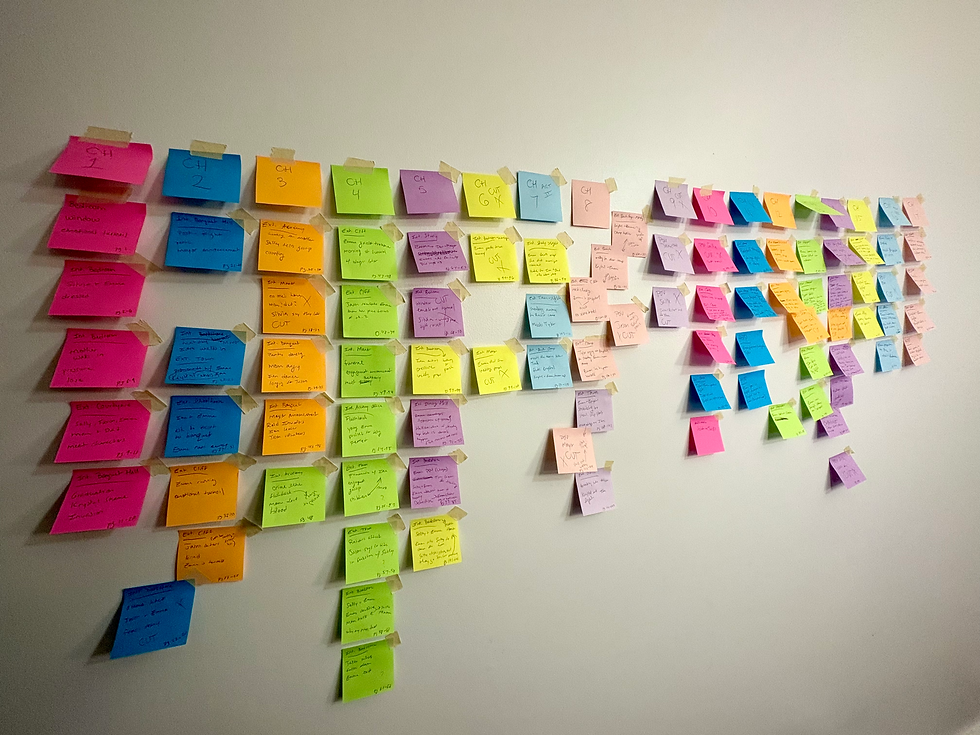
The sticky note method can also be called the bulletin board method or storyboarding. It’s a strategy many writers utilize to see all the parts of the book laid out in front of them.
You’ve seen it in the movies: A writer has colored index cards or sticky notes as they rearranged scene after scene to get their book right.

Each sticky note or index card (usually in a color-coded system) represents a scene within the story that is posted on a wall, bulletin board, white board, etc. Then, the writer can moves things around and see how their story will look with the changes. Do two scenes go well together? Should something in Act 2 be moved to Act 1? A writer can answer those kind of questions by using the sticky note method.
Traditionally, this process is done during the initial outlining phase (before you write the draft) as writers use the storyboarding to figure out what their story is. However, I propose that for novel writing you use this sticky note method after you write the first draft.
Storyboarding After The First Draft
Whether you’re a planner or a pantser, organizing your chapters and scenes by color and posting them on a wall in front of you helps you see your book in a new angle.
Book editing can be very overwhelming as you anticipate lots of changes and sometimes you don’t know where to start your revisions. By taking your manuscript draft and converting it into a sticky note wall, you can easily visualize your revisions before you tackle them. You take what is overwhelming and you create a plan with clear steps to follow.
When I first attempted to edit my novel, I knew I needed to move things around but I didn’t know where to move them to. With the sticky notes, I could easily move a scene to a different place and see if it worked. If it didn’t work, it was easy to move it back. Rather than scrolling through a large Word document or shuffling hundreds of printed pages, all I had to deal with were a little less than a 100 sticky notes to figure out a revision plan.
After creating my sticky note wall, I knew what scenes I was going to cut, where I would move scenes, which scenes I would combine, and how to reorganize my chapters.
It was easy to see what chapters were too long, what scenes were redundant, and what chapters were too light. I also could note info-dumps because summarizing the scene for the sticky note helped my look past all the details in my writing and analyze the bare bones.
The sticky note method certainly works in the early stages of story outlining, but when you use it for revisions you gain new insights about the structure of your book that you would not have been able to see otherwise.
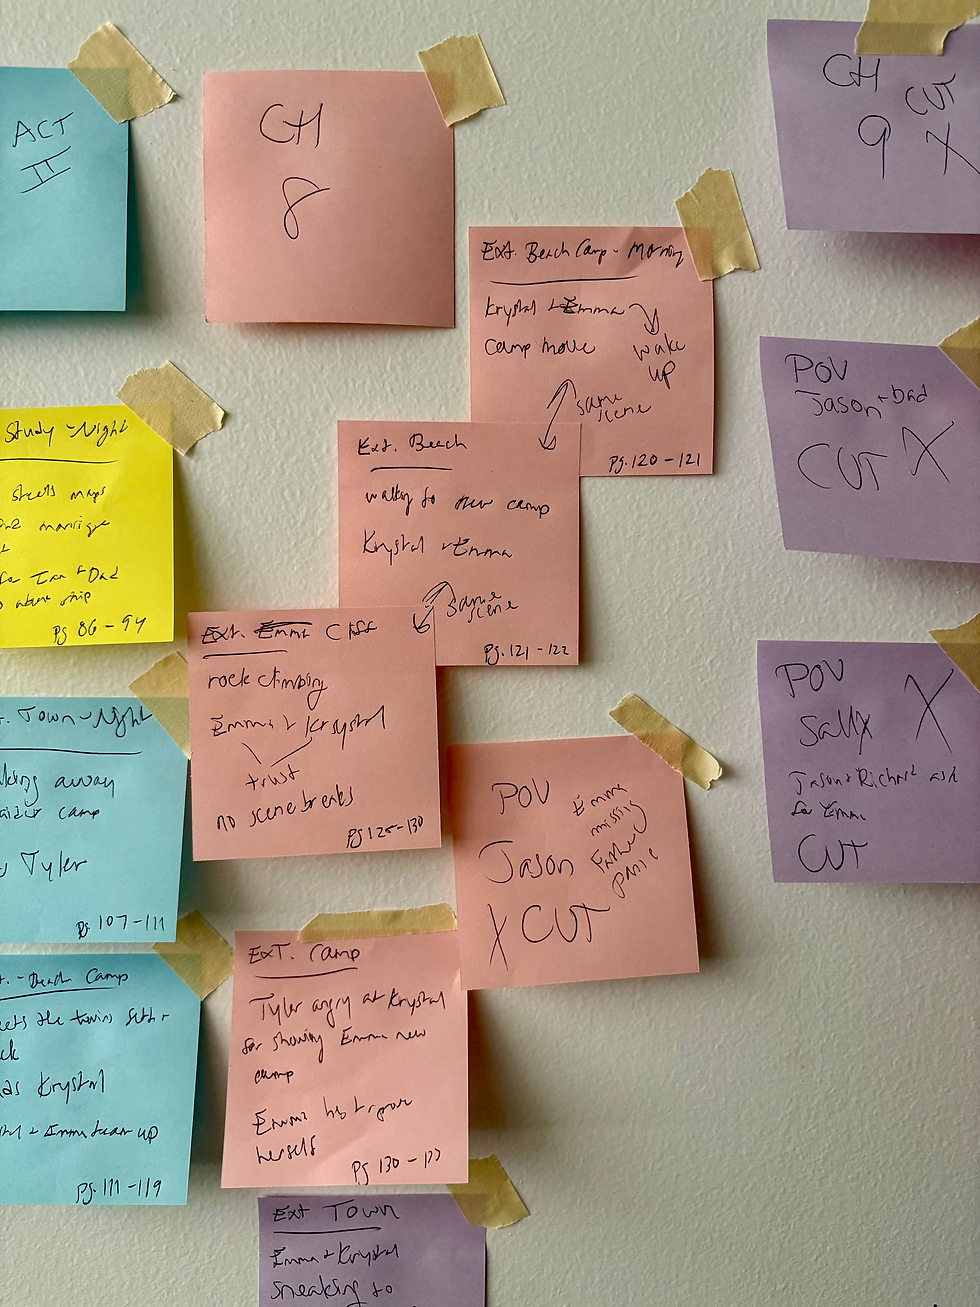
For example, in Chapter 8 I noticed I had a scene break every 2-4 pages. After seeing 3 sticky notes essentially have the same action with the same set of characters, I realized I could combine all three scenes into one scene and eliminate the scene breaks entirely.
With the sticky note method, it’s also easy to chart your revisions. By the end, you have a nice colorful wall with your revisions mapped out.

Looking at the sticky note colors, you can point out where all the changes are without having the read what’s on the note. Since I color-coded by chapter, I can see that a Chapter 3 scene is going to move down to Chapter 2 and Chapter 6 scene is going to move into Chapter 5. I can also see that the green, Chapter 4, is really heavy. During my revisions, I am going to look closely at that chapter and see what I can trim down or cut.
With sticky notes, there is no wild goose case or scavenger hunt of trying to find your revisions because you can pinpoint exactly where you made changes based on colors and note placement.
Using a sticky note wall as an editing technique makes approaching revisions easier and it gives writers more confident as they rewrite or cut scenes. That is why I recommend storyboarding after you write your first draft.
Did I stumble upon this technique because I waited too long to edit and forgot everything that I wrote? Yes. But, I am glad I did because this sticky note method made the editing process simpler and less daunting. And, it was a lot easier to kill my darlings that just needed to go.
How To Storyboard With Sticky Notes
Now that I’ve convinced you to use the sticky note method for your book revisions, you may be wondering how to exactly go about it.
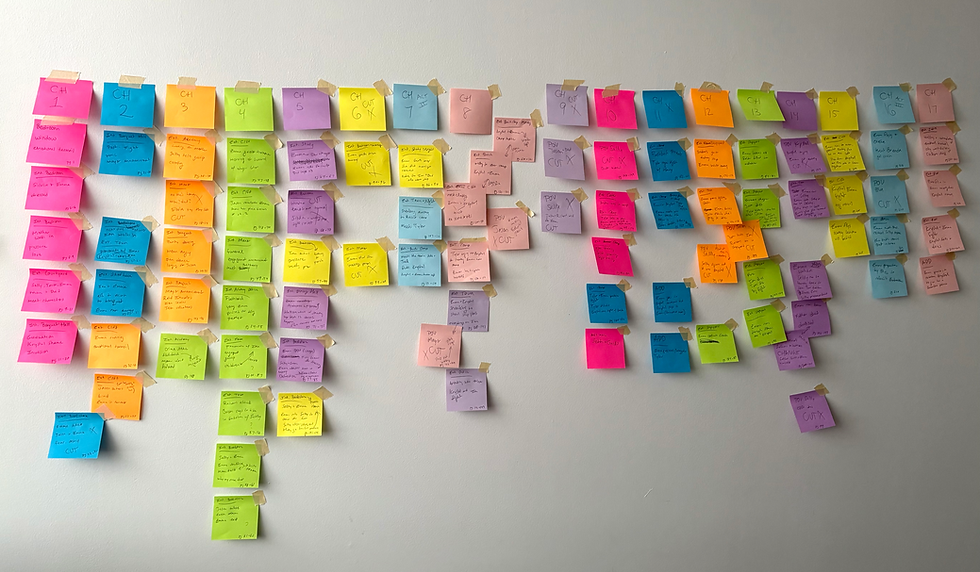
Everyone’s process is different and what worked for me might not work for you, but I’m still going to show you what I did to take my 17 book chapters and convert them into a wall of 97 sticky notes.

Step One: Get Colored Sticky Notes
The first thing I had to do was buy a pack of colored sticky notes. If you can, get a different color for each chapter. The largest pack I could find was a pack of 9 colors, so I had some repeating colors. Since I followed a pattern, the colors used twice were separated far enough and were in different acts which avoided confusion.
Colored index cards or colored markers will work just as well. You can try to do this digitally, but the hands-on experience is a 100x better. To be a writer, you need to get off of the computer sometimes because your eyes cannot always see what you need through a screen.
Step Two: Create A Color System
Once your have your colored notes, cards, or markers, assign a color to represent each chapter. For example, I had Chapter 1 had pink, Chapter 2 as blue, and Chapter 3 as orange. By having the color assignment be my chapter, when you rearranged scenes you know exactly where to look in your document to find the original scene and you know where to move it too.
You can use a different color-coded system, such as having one color for present scenes and another color for flashbacks. Or have colors assigned by which characters are present in the scene. Or you can color it within the 3-Act structure (inciting incident, climax, resolution, etc.). For me, I needed to see my chapter breaks clearly and anticipated I would be combining chapters and moving scenes around, which is why I colored-coded by chapter. If you are more concerned about the 3-Act plot points or when a character is present in a scene, you can assign your colors within any system. Do what you want to see.
Step Three: Summarize Your Scenes
As you are posting your notes the wall, what you should write on each note is the setting heading (I used scriptwriting language like INT. BEDROOM - DAY), which characters are present, and what the action or thing that happens during that scene. Use concise language on the sticky note to see the scene at its bare bones. I also wrote the page span on the scene (such as pg. 6 – 11) to not only help me find the scene in the Word document but to also see how thick each scene was. When making cuts and rearranging scenes for chapter efficiency and flow, the page spans were especially helpful.
In Chapter 1, I had one note where the action was “getting dressed,” but the page span was 4 pages. I drew an X on that note to tell myself to trim down or cut during my revisions because I don't need 4 full pages of just dressing. I read that chapter several times before doing the sticky note method and I never realized how little happened in those pages.
Step Four: Moves Things Around
The last step to create the sticky note wall is to make notes and changes as you get. If you get the ick from a scene, mark the note to tell yourself to tweak the scene. If you think a scene would work better somewhere else, move the sticky note right then and there.
If you tell yourself to look at it later, you never will. Make the changes and move things around as you think of it. Act immediately when the idea strikes.
The sticky note method works best when you go off of instinct and follow your gut. Don’t second guess anything and remember, what you do on your wall is not set in stone. You can always moves things back so make crazy changes and see what happens. Typically, what you least expect is what works best.
Why Storyboarding Works For Book Editing
Next time you are getting in the weeds of editing you book, I highly recommend plot mapping with sticky notes. Not only will you give yourself a nice refresher of every nook and cranny of your book, but you will also be able to see all the bones of plot.
Every paragraph and scene you write out is the flesh of your story. It's the flesh readers care about, but that flesh will not stand if it doesn't have strong bones underneath. And in revisions, it's the bones that need edit. For the first round of book editing that it is.
Book editing comes from many rounds of rewrites and revisions. Here is a quick break down of editing a book:
Content and Developmental Editing
Line Editing
Copy Editing
Proofreading
Step one of editing is the toughest because that's where you have to kill your darlings, restructures scenes and chapters, fine tune your characters and correct plot holes. But where exactly are your plot holes? What chapters aren't working? What scenes need to change?
You can read and re-read your book over and over but even then, you may not be able to answer all of those editing questions. But if you storyboard your book with sticky notes, you can answer your questions.
Summarizing each scene concisely on each note will lead you to many realizations about your book. Is the scene's summary bland and boring? Then your scene, not matter how well you wrote it, will most likely bore readers and could use some reworking.
After making my plot map with sticky notes, I cut many scenes because it was unnecessary (or what I called, a waste of pages) and I could be more efficient with my story be removing a conversation and having that information appear later in a different conversation.
Storyboarding is certainly helpful during the outlining stages, but to make the book editing process less taxing and easier to handle you should storyboard again. It will not be redundant if you storyboard before and after your draft because during the writing process your book will change. No matter how much of a planner you are, every writer is a panster as our writing brains take over and we act on inspiration.
As a fellow writer, I wish you luck in your writing journey and good luck with book editing! I hope you try this revision strategy of sticky note storyboarding.
Want to watch my process of creating a sticky note wall? View “I Make A Plot Map With Sticky Notes” on YouTube and see me making my revision plan in real time.

Comments